Friday, August 20, 2021

Sunny Studio Stamps: Mahalo


Hi there! I have a card to share with you that I created with just die cuts. The only stamping on the whole card is the sentiment. I really love this look! This card is a tribute to the last days of summer. Soon I'll be wanting to make fall and Christmas things. I used several different products from Sunny Studio stamps and will list and link them in the descriptions below.


To start off with I cut a light blue rectangle out with the smallest of the Stitched Rectangle dies. Next I cut out a while piece with the same die and cut the top of it with the clouds die from the Slimline Nature Borders dies. I then cut another dark blue piece out with the same Stitched Rectangles die. I cut this off about half way and glued that down to the light blue piece. I then cut another lighter blue piece out with the same die and cut it about one third of the way down using the scalloped edge from the Slimline Pennants dies. Next I cut out the sand using the same smallstitched rectangle die and then cut it along the bottom to create the curve using the Slimline Nature Borders dies


I stamped the sentiment from the Tiki Time stamp set with brown ink along the sand layer. Next I cut out three houses from the Comic Strip Everyday dies and assembled them to look like little beach houses. I then added them to the top of the sand border with foam tape. Next I cut out the sun and the clouds from the Comic Strip Everyday dies and added them to the sky with foam tape. Lastly the whole panel was added to a top folded A2 size card base. 


I hope you all have had a lovely summer so far! Happy weekend!


Kay :)



Friday, August 6, 2021

Sunny Studio Stamps: Happy Hamsters


Hi there! Kay here and I have a fun card to share with you today using the super cute Happy Hamsters stamp setand the Happy Hamsters Coordinating dies. I also used the Stitched Rectangle diesand some patterned paper from the Holiday Cheer 6x6 Cardstock pad.


First off, I created a background for the cute little hamsters by blending some distress ink onto white cardstock. I used Mowed Lawn for the grass and Tumbled Glass for the sky. I then speckled some darker blue Peacock Feathers ink mixed with water over all of it. I stamped the sentiment from the Happy Hamsters stamp set along the bottom and then cut this panel out with the medium Stitched Rectangle dies. I then cut out a panel of patterned paper from the Holiday Cheer paper pack just one size larger using the largest of the Stitched Rectangle dies. I then layered both of these onto my white cardbase.


Next I colored the cute little hamsters and wheel with Copic markers and cut them out with the Happy Hamsters coordinating dies. I added these to my card using foam tape.

I hope you have enjoyed my card today! Thanks so much for stopping by and Happy weekend!


Kay :)


Friday, July 23, 2021

Sunny Studio Stamps: Candy Shoppe


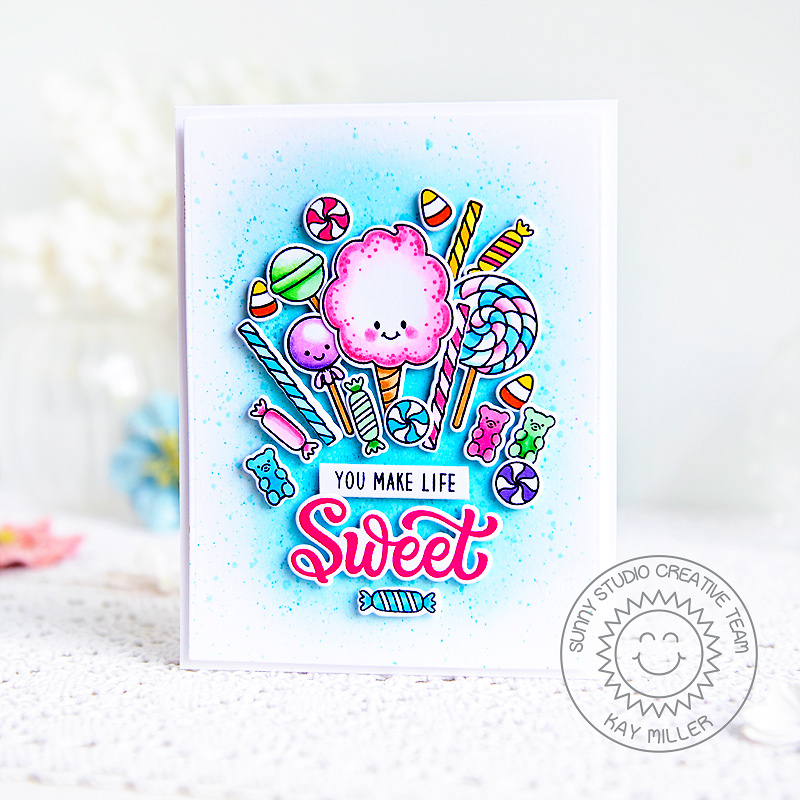
Hello! Kay here, and I have a fun card to share with you today featuring the Candy Shoppe stamp set and Candy Shoppe coordinating dies from Sunny Studio Stamps. The images in this stamp set are so cute and with all of the different sentiments included, this stamp set can be used for so many different occasions!


I started by blending some Peacock Feathers distress ink onto Bristol Board cardstock. I then sprinkled with water and patted it dry with a paper towel, and lastly speckled it with some of the same ink diluted with water. With my background all made, I then stamped and colored all of the cute images from theCandy Shoppe stamp setwith copic markers.


I cut all of the images out with theCandy Shoppe coordinating dies. I stamped the sentiment and cut it out also and then added everything to my card using foam tape. 

I just love how it turned out and I have plans to give this to a little niece of mine who has a birthday this month! I think it's perfect!

I hope you have enjoyed my card today! Thanks so much for stopping by!

Happy Weekend!

Kay :)


Friday, July 9, 2021

Sunny Studio Stamps: Poppy Fields


Hi there! I have a card to share with you using the beautiful new Poppy Fields stamp setPoppy Fields coordinating dies and the Inside Birthday Greetings stamp set  from Sunny Studio Stamps!   

And yes, I do know that poppies are red, but I decided to make a bouquet of poppies in a lovely mix of pink, purple and orange! That's what's so fun about stamping!


I first created a background for my card using distress inks in Blueprint Sketch, Wilted Violet and Broken China. I blended these onto Bristol Board cardstock and then speckled with water and blotted.

I then stamped all of the flowers, leaves and stems with the Poppy Fields Stamp set in the following Pinkfresh Studio inks:

Pinks: Ballet Slipper, Sparkling Rose, Bubble Gum, Raspberry Bliss

Oranges: Peach Fizz, Apricot, Clementine, Persimmon

Purples: Soft Lilac, Candy Violet, Lavender, Regal Kiss

Greens: Fresh peas, Olive


I cut all of the images out with the Poppy Fields Coordinating dies.

I then adhered the stems with liquid glue first and then added all of the flowers and leaves with glue dots.

Lastly I stamped the sentiment from the Inside Birthday Greetings stamp set on black cardstock and heat embossed it. I cut it out and added it to the bottom of the bouquet with foam tape.

I hope you have enjoyed my card today!

Thanks so much for stopping by and enjoy your weekend!


Kay :)


Friday, June 25, 2021

Sunny Studio Stamps: Color My World


Hi there! I have a card to share with you using the new Color My World stamp setand Color My World coordinating dies. I chose to use just the crayon and sentiment out of the stamp set, but I can't wait to use some of the other fun images too! I have many fun ideas in my head for the paint set!


So I first stamped all of the crayons in the Color My World Stamp setin several different colors using inks from Pinkfresh. These stamps are four step layering stamps, and the Pinkfresh inks come in four shades for each color, so they work perfectly! I then cut out all of the images with the Color My World diesand set them aside. 

I created my background using the same inks that I stamped the crayons with. I watercolored onto white cardstock. Cardstock doesn't move the ink around quite as well as watercolor paper, but since the areas were small it worked fine. I then speckled with some more of the same ink colors and some white ink as well.


After this dried, I cut my panel out and mounted it onto a A2 white card base with foam tape. I then added all of the crayons with foam tape as well. The sentient was heat embossed with white embossing powder on black and pink cardstocks and added above the crayons with foam tape.


I hope you have enjoyed my card today!

Thanks so much for stopping by! 

 Have a great weekend!


Kay :)


Friday, June 11, 2021

Sunny Studios: Picket Fence Border Die

 Hi there! Kay here today, and I am sharing a card with you that I created with the new Picket Fence Border die. I paired it up with one of my favorite Sunny Studio dies, the Comic Strip Everyday die set. I also used the Slimline Nature Borders diesand the Teacher Appreciation stamp set.

This card is completely made with dies other than the sentiment. I have always loved that look! I used many different colors of cardstocks from my stash and some from my scrap box, so I can't tell you which companies they all came from, but you can create something similar with any cardstocks of your preference.


I first glued down the blue piece for the background and sky. The hills I cut with the Slimline Nature Borders diesand glued them down with liquid glue. I then cut out the picket fenceand added that along the bottom. The grass was then cut and added on along the bottom edge of the fence with foam tape.


I then cut out the little house and trees using the Comic Strip Everyday diesand assembled them with liquid glue and added them to my card with foam tape. The sun and clouds were also added with foam tape. Lastly I heat embossed the sentiment from theTeacher Appreciation Stamp seton a black strip and added that to the bottom of my card with foam tape. 


I hope you have enjoyed my card today and I hope it inspires you with some fun ways to create a scene with the new Picket Fence die!


Thanks so much for stopping by!


Kay :)

Friday, May 28, 2021

Sunny Studio Stamps: Gift Card Pocket


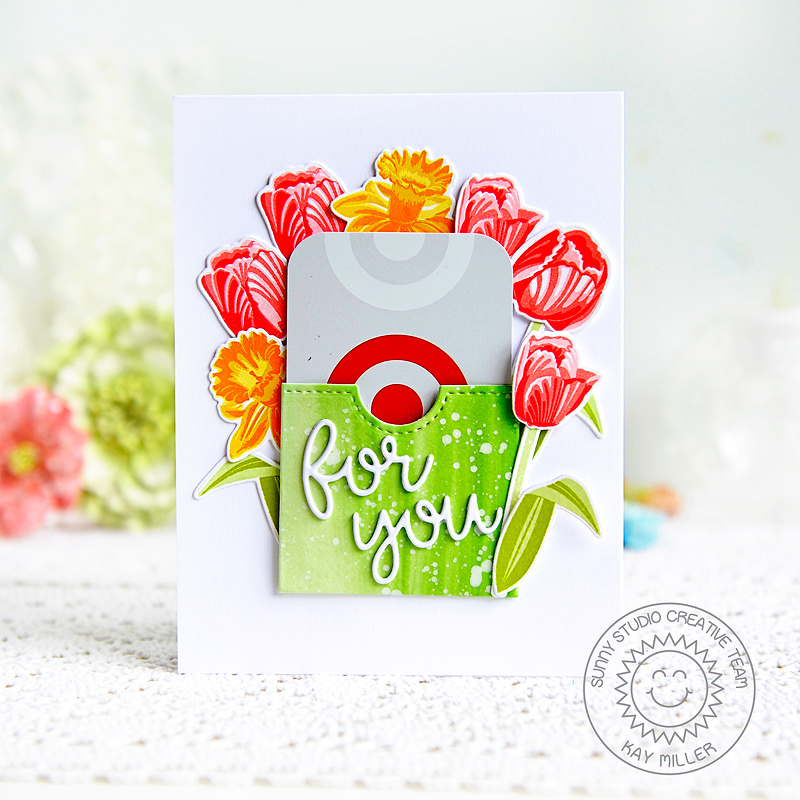
Hi there!  I have a cute card to share with you today using the new Gift Card Pocket die along with two older stamp sets Timeless Tulips and Daffodil Dreams from Sunny Studio Stamps. I don't know about you, but I've had a lot of graduates to send gift cards to in the past month, so the Gift Card Pocket Die has really come in handy! And because graduation happens in the spring, the Timeless Tulips and Daffodil Dreams stamp sets are perfect for this time of year! 


So for my card, I started by watercoloring a piece of Bristol Board card stock with some green ink. I then speckled it with white ink. When that was dry, I cut the Gift Card Pocket Die out. I then cut the for you out of white card stock twice and added it to the front of the pocket. 


I stamped all of the tulips with Pink Fresh inks using Coral Reef, Passion Fruit and Berrylicious. I stamped the daffodils with Pink Fresh inks using Lemon Whip, Sunshine, Sweet Mustard and Marigold. The leaves and stems were also stamped with Pink Fresh inks using Fresh Pear and Olive.

I then cut all of the flowers out using the Timeless Tulips Coordinating dies and the Daffodil Dreams coordinating dies. Most of the flowers I glued down behind the gift card pocket before adding it with double sided tape. I then added the last tulip on top of the pocket with liquid glue. 


And last but not least I added a Target gift card! Such a fun card and great gift for someone!


I hope you have enjoyed my project today!


Thanks so much for stopping by!


Kay :)